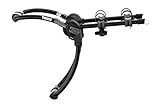
If you’re a fan of the Thule line, you will love the ease of use of the trunk-mounted carriers. Instead of actually using large mechanisms to mount your bicycle carriers to the back of your vehicle, purchasing a trunk mount carrier allows you to set it up in just a few minutes. There are no tools needed for this.
We have created this Thule Gateway vs Passage in order to show you what the differences are between these highly popular trunk mounts. It is our goal to fully illustrate their features so that you can be sure that you are getting the right product for you.
Before we begin our comparison, let us first tell you how easy it is to set these up.
You might like: Thule 480 vs 480r: Which Is The Best Option?
Thule Gateway vs Passage
How They Fit On Your Trunk
Due to the shape of the Gateway and Passage, you can fit them onto the trunk of your vehicle and use just six attachment points in order to highly secure your bicycles. In order to get either one of these trunk mounts onto your vehicle, you must do the following:
- Refer to the instruction manual and see which dial position you must be in for your particular vehicle model.
- Once the dial has been set, place the trunk mount on the top of your trunk.
- Fit the six attachment points to the top, sides, and bottom of your trunk. With each attachment point, pull it taught using the dials and once your mount is tight onto your vehicle, fold up the remaining strap length.
- In order to attach your bicycle, slide it onto the mount and fasten it to your frame using the cradle straps on each entry point.
That’s all there is to it. It takes just a couple of minutes, which is unlike most other car mount systems.
What They Have In Common
Before delving right into the comparison, let’s just take a look at the features that the Gateway and the Passage both have.
- Carries two bikes: Each of these trunk mounts are capable of carrying two bicycles side to side.
- Affordable: The Gateway and the Passage are both affordable options that are made of high-quality materials. They will be just as durable as any expensive bicycle mount.
- 6 straps: The 6 attachment points mentioned earlier are actually straps that have hooks at the end of them. Each of these folks attaches to the edges of your trunk.
- Fits most spoilers: The Gateway and the Passage both fit onto most vehicle trunks.
- Locks not included: Please remember that locks are not included in the package.
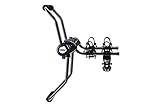
Thule Gateway vs Passage: The Differences
These trunk mounts are identical in almost every way. Their main difference is the fact that the Gateway has the ability to adjust to self in order to make the bicycles level with the ground. Although the Passage is going to make the bicycles fairly level, it may actually produce a bit of an angle between the bicycle and the ground. This all depends on the shape of your bicycle.
With the Gateway, it does not matter which bicycle you put onto the rack. You can simply adjust the angle by using the cinching lever. Simply unscrew the cinching lever and adjust the angle of the arm. Once the arm is adjusted to the point where the bicycle is parallel with the ground, simply screw the cinching lever tight.
Price Comparison
In order to compare the prices between these similar car mounts, it is best to view them directly from the merchant. This is because prices are always subject to change, so we cannot list the price here. If you like to compare the current prices for the Gateway and the Passage, please see the Amazon links below.
Thule Gateway vs Passage: The Verdict
We have reviewed many of the Thule mount systems on this website. But nothing comes close to the ease-of-use of the Gateway and the Passage. Simply attach these trunk mounts to your vehicle and a matter of minutes. There are no separate parts or tools to deal with.
We prefer the Gateway for the fact that it does have the adjustable arm. It allows you to adjust the angle of the bicycle so that it can be parallel with the ground. However, the Passage is also a very good mount. What you feel the most comfortable with is up to you.